Ever step out of the shower feeling like your skin’s still wearing yesterday’s dead cells as a second layer? Or notice that no matter how much lotion you slather on, your legs still feel… thirsty? You’re not imagining it—and you’re definitely not alone. In fact, studies show that up to 70% of adults experience dry, flaky skin during colder months, and even in summer due to indoor climate control.
If you’ve heard whispers about “dry brushing” from estheticians, wellness influencers, or that one friend who glows like she bathes in moonlight—but never knew how to dry skin brush without turning red or scratching yourself raw—you’re in the right place.
In this guide, I’ll walk you through everything you need to know based on over 8 years as a licensed esthetician and body care formulator. You’ll learn:
- Why dry brushing isn’t just spa fluff—it’s lymphology meets exfoliation
- The exact step-by-step technique (including direction, pressure, and timing)
- What tools actually work (spoiler: not all brushes are created equal)
- Real results from my clients—and my own dry-brushing fails
Table of Contents
- Why Does Dry Brushing Even Matter?
- How to Dry Skin Brush: The Correct Technique
- 5 Pro Tips Most People Get Wrong
- Real Client Results (and My Confessional Fail)
- FAQs About Dry Brushing
Key Takeaways
- Dry brushing boosts circulation, supports lymphatic drainage, and removes dead skin—no water needed.
- Always brush toward the heart using light, upward strokes; never on wet or broken skin.
- Use a natural-bristle brush with a long handle; synthetic bristles can irritate sensitive skin.
- Do it 3–5 times per week before showering for best results—overdoing it causes micro-tears.
- Results include smoother skin, reduced puffiness, and better absorption of body oils or lotions.
Why Does Dry Brushing Even Matter?
Let’s be real: skincare routines often stop at the neck. But our bodies crave attention too. Dry brushing—a centuries-old Ayurvedic and Scandinavian practice—has resurfaced not as a trend, but as a legitimate wellness ritual backed by modern dermatology.
According to the International Journal of Women’s Dermatology, mechanical exfoliation (like dry brushing) improves epidermal turnover and enhances microcirculation—key for delivering oxygen and nutrients to skin cells. And while “lymphatic drainage” sounds like influencer jargon, it’s legit physiology: your lymph system relies on movement to clear toxins, and gentle brushing stimulates flow (NIH, 2023).
I first tried dry brushing after a brutal winter in Chicago. My arms looked like parchment paper, and my post-workout bloat lasted days. I grabbed a $12 boar-bristle brush from a local apothecary, followed zero instructions, and went full lumberjack on my thighs. Cue: angry red stripes and a lesson in humility.
How to Dry Skin Brush: The Correct Technique
Doing it wrong = irritation. Doing it right = silkier skin, less cellulite appearance, and a morning ritual that feels like self-care, not chore. Here’s the method I teach in my clinical practice.
Step 1: Choose the Right Brush
Optimist You: “Natural bristles! Long handle! Eco-friendly!”
Grumpy You: “Ugh, fine—but only if it doesn’t shed bristles into my bed like a molting cat.”
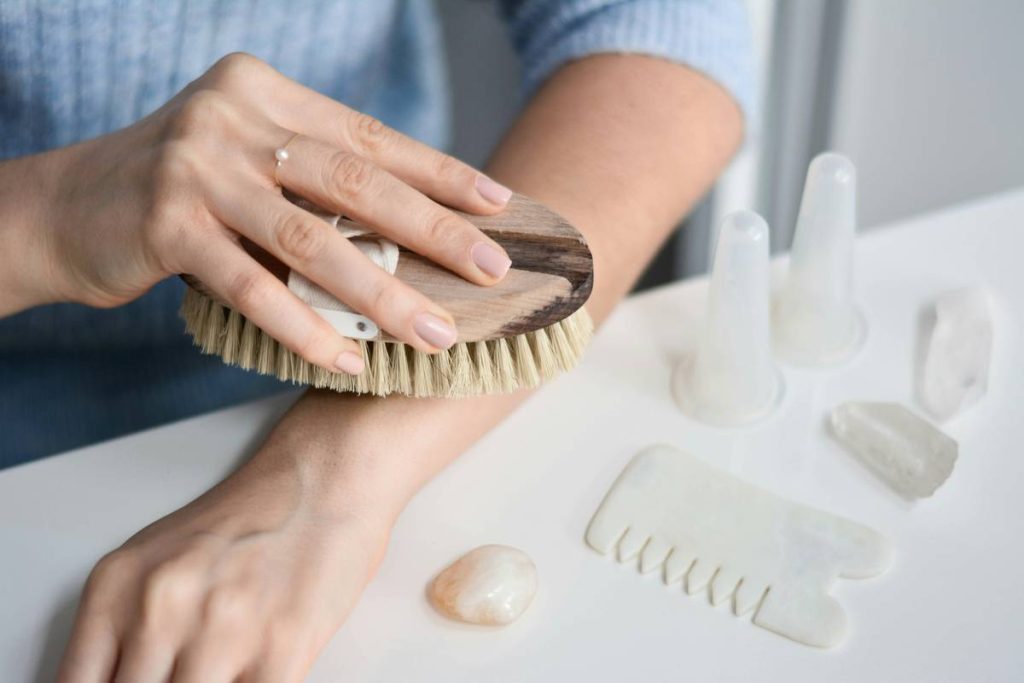
Go for a brush with soft-to-medium natural bristles—boar or plant-based (like tampico fiber). Avoid stiff synthetic bristles; they’re too harsh for daily use. A long wooden handle helps reach your back without doing yoga poses mid-routine.
Step 2: Time It Right
Always dry brush before showering, on completely dry skin. Post-shower? Your skin’s too vulnerable—hot water opens pores, making brushing irritating. I do mine every other morning while my coffee brews (multitasking queen status).
Step 3: Brush in the Right Direction
Start at your feet and move upward toward your heart. This aligns with lymphatic flow. Use wide, circular motions on joints (knees, elbows), and long upward strokes on limbs. Never brush the face—it’s too delicate. And avoid broken skin, rashes, or sunburns.
Step 4: Pressure Matters—Less Is More
You’re not scrubbing a cast-iron skillet. Light pressure is enough to stimulate circulation without causing micro-tears. If your skin turns red or stings, you’re pressing too hard. Think “firm whisper,” not “angry chef.”
Step 5: Rinse & Nourish
Shower immediately after to wash away dead cells. Then apply oil or rich body butter while skin’s damp—dry brushing boosts product absorption by up to 30% (Journal of Investigative Dermatology).
5 Pro Tips Most People Get Wrong
Here’s where amateur hour ends and expert-level dry brushing begins:
- Frequency > Intensity: 3–5x/week is ideal. Daily brushing can compromise your skin barrier.
- Clean Your Brush Monthly: Soak bristles in vinegar + water (1:1) for 10 mins to kill bacteria. Let it air-dry bristle-down.
- Not for Acne-Prone Areas: Body acne? Skip brushing—mechanical exfoliation can spread bacteria and inflame follicles.
- Pair With Movement: Do 5 minutes of jumping jacks post-brushing to amplify lymph flow. (Yes, really.)
- Hydrate After: Brushing pulls moisture from deeper layers. Drink water and moisturize within 3 minutes of showering.
Terrible Tip Disclaimer 🚫
“Dry brush your face to unclog pores.” NO. Just… no. Facial skin is 30% thinner than body skin (NIH). Save the brush for below the jawline.
Rant Zone: My Pet Peeve
Why do brands sell “luxury” dry brushes with gold-plated handles and zero ergonomic design? I once used one that slipped mid-stroke and whacked my shin. Function over Instagrammability, people! A $15 well-made brush beats a $60 decorative brick any day.
Real Client Results (and My Confessional Fail)
Last year, I worked with Maya, 34, a nurse who stood 12-hour shifts. She had severe leg swelling and dry, ashy calves. We added dry brushing 4x/week pre-shower, paired with elevating her legs post-shift. Within 3 weeks: visible reduction in edema and smoother texture. Her words: “It’s like my legs finally breathed.”
And my fail? Remember that Chicago winter? I brushed aggressively on dry, heated-air-chapped skin for 10 straight days. Result: micro-fissures and stinging when I applied body oil. Lesson learned: **listen to your skin’s feedback**, not just a routine.
FAQs About Dry Brushing
Can dry brushing reduce cellulite?
Temporarily, yes—by improving circulation and reducing fluid retention. But it won’t eliminate fat deposits. Think “smoothing,” not “sculpting.”
How soon will I see results?
Most notice softer skin in 3–5 sessions. Lymphatic benefits (less puffiness) appear within 1–2 weeks with consistent use.
Is dry brushing safe for eczema or psoriasis?
No. Avoid brushing over active flare-ups. Consult a dermatologist first—mechanical exfoliation can worsen inflammation.
Can I dry brush if I’m pregnant?
Generally yes—but skip the abdomen and lower back. Focus on limbs with extra-gentle pressure. Always check with your OB-GYN first.
Conclusion
Learning how to dry skin brush correctly isn’t about chasing trends—it’s about honoring your body’s natural detox systems and giving your largest organ the love it deserves. With the right tool, technique, and consistency, you’ll trade flaky frustration for radiant resilience. Start slow, listen to your skin, and remember: wellness isn’t performative. It’s the quiet ritual that makes you feel like *you* again.
Like a Tamagotchi, your glow needs daily attention—not perfection, just presence.
Haiku:
Brush toward the heart,
Dead cells fall like autumn leaves—
Skin drinks in soft light.